Proactively Detect Critical Threats and Strengthen Kubernetes Security with Falco

- Written by:-
- Pradip Khuman
- Kubernetes
- No Comments
What is Falco?
Falco is an open-source security tool for Kubernetes designed to detect and alert on unusual behavior within a cluster. Initially developed by Sysdig, Falco monitors system activities in real-time and provides alerts for suspicious events. Its flexibility allows users to create custom rules to monitor various aspects of their containerized environments.
Falco offers runtime security across hosts, containers, Kubernetes, and cloud environments. It detects and alerts on abnormal behavior and potential security threats in real-time. At its core, Falco is an agent that monitors events (such as Linux kernel events and other data sources via plugins) and generates real-time alerts based on user-defined rules. It also enriches these events with contextual metadata from container runtimes and Kubernetes. The alerts can be forwarded to other systems for action or further analysis in SIEM or data lake systems.
Originally created by Sysdig, Falco is now a graduated project of the Cloud Native Computing Foundation (CNCF) and is used in production by various organizations.
What does Falco do?
Falco uses syscalls to monitor a system’s activity, by:
- Parsing the Linux syscalls from the kernel at runtime
- Asserting the stream against a powerful rules-engine
- Alerting when a rule is violated
Falco’s monitoring capabilities are not limited to syscalls as it can be extended via plugins to ingest data from many more types of sources.
What Does Falco Monitor?
- Privilege Escalation: Detection of actions using privileged containers.
- Namespace Changes: Use of tools like setns to alter namespaces.
- Access to Sensitive Directories: Reading or writing to directories such as /etc, /usr/bin, and /usr/sbin.
- Symlink Creation: Identifying the creation of symbolic links.
- File Ownership and Mode Changes: Monitoring changes in file ownership and permissions.
- Network Activity: Detecting unexpected network connections or changes to sockets.
- Process Spawning: Using execve to identify newly spawned processes.
- Shell Execution: Running shell binaries such as sh, bash, csh, zsh, etc.
- SSH Activity: Execution of SSH-related binaries like ssh, scp, and sftp.
- Core Utility Modifications: Changes to core utilities in Linux.
- Login Binary Changes: Alterations to login-related binaries.
- Password Management: Changes to shadow or password management executables like shadowconfig, pwck, chpasswd, getpasswd, chage, useradd, etc.
Install Falco using Helm Chart
- Add & update Helm Repo
					helm repo add falcosecurity https://falcosecurity.github.io/charts
helm repo update
- Install Falco without UI
helm install falco -n falco --set tty=true --create-namespace falcosecurity/falco
- OR install Falco with UI
helm install falco -n falco --set tty=true falcosecurity/falco --create-namespace --set falcosidekick.enabled=true --set falcosidekick.webui.enabled=true
That’s it! We’ve now successfully installed and run Falco on Kubernetes cluster.
- Create an Ingress resource to expose Falco:
					apiVersion: networking.k8s.io/v1
kind: Ingress
metadata:
  name: falco
spec:
  ingressClassName: nginx
  rules:
  - host: <DOMAIN>
    http:
      paths:
      - backend:
          service:
            name: falco-falcosidekick-ui
            port:
              number: 2802
        path: /
        pathType: Prefix
- Apply ingress manifest file in falco namespace
kubectl apply -f ingress.yaml -n falco
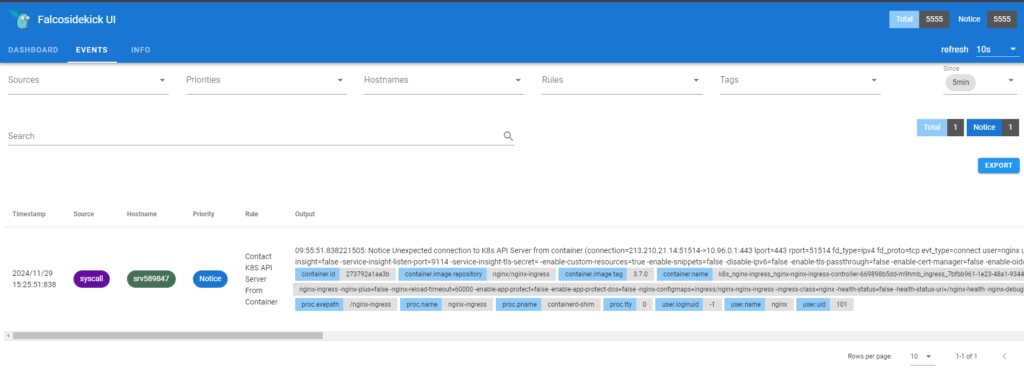
Use a web browser to access Falco.
- Open domain used in ingress.yaml to see events of Falco Login using admin/admin credentials and go to event tab to see the events of Kubernetes cluster
The user can modify the credentials during the Falco installation process by utilizing the helm chart if necessary.
					helm upgrade --install falco -n falco --set tty=true falcosecurity/falco \
  --set falcosidekick.enabled=true \
  --set falcosidekick.webui.enabled=true \
  --set falcosidekick.webui.user=superuser:veryverystrongpassword